
A lidded project is one that requires you to measure the box's sides and perimeter. The lid and box are typically cut from the same 2-in thick block of seasoned wood. To square the base, start by cutting a foot on one side of the wood. To ensure that the final box is able to sit on it, you need to make sure the base's center is slightly recessed. The recess can be cut with a small tool.
Hollowing end grain in lidded cabinets: challenges
One of the most difficult tasks in box-making involves hollowing end grains. This process is difficult and involves specialist tools. An old screwdriver can be used to create a basic hollowing tool that costs $30. A gouge can be purchased and used for this purpose. Avoid sharp edges when hollowing end grain. A gouge should have an oval shape fingernail and a long flat bevel.
One of the biggest challenges of hollowing end grain is that it is five times harder than side grain. It can also easily tear out. This is why many experienced bowl turners experience difficulties hollowing end-grain. You can overcome these problems by switching to a scraper or a gouge. However, it is worth noting the special end grain tools that are required for lidded boxes.
Methods to create a snap-fit lidded bag
A snap-fit lidded container is a container that has a sliding closure. These boxes are often filled with liquids or other liquid-filled containers. These boxes are easy to assemble, disassemble, as well as being automated for low assembly costs. Several types of snap-fits are available, so engineers should choose the best ones based on cost, strength, and failure rate. Here's a brief overview of the different types of snap-fits.
Use a 3-D printer for creating a snap-fit lidded package. It is important that the upper half of the box be designed correctly. The upper should be flush with the base. The lid should remain in place. The lid should fit snugly. You should remove wood slowly to achieve this. This may seem complicated, but it's worth the effort.
Wooden lidded containers
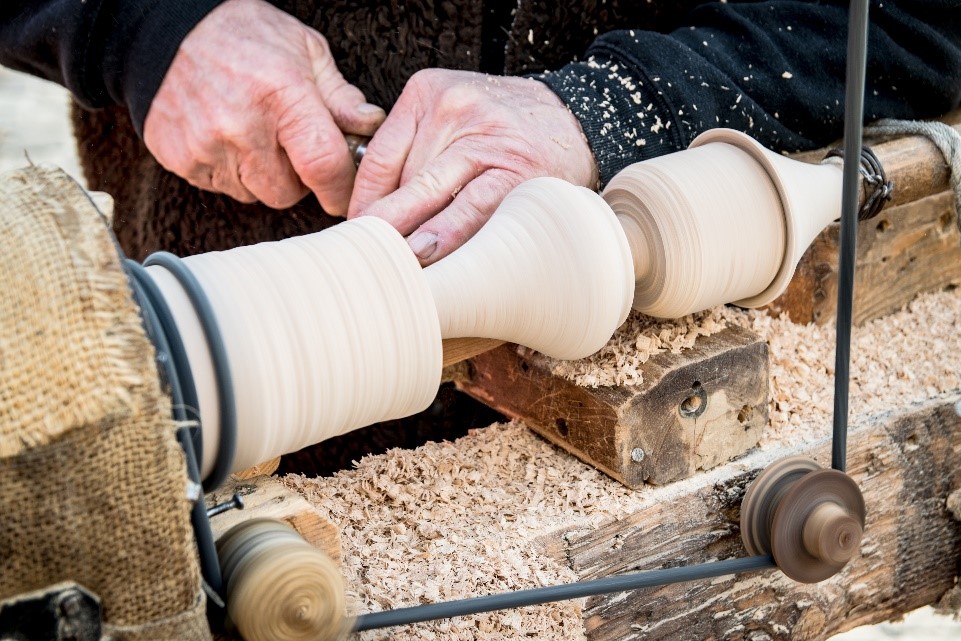
Woods are taken from fallen trees to create the various types of lidded boxes. After a tree has been harvested, it is dried to prevent cracks. The wood is then rough turned to create a general shape. After drying, the wood shrinks. Depending on the style, the lidded boxes can be made of different wood types. A lid is generally made from two pieces, one smaller than the other.
A lathe was used to turn small circular containers that had lids into lids. Boxwood, a slow growing tree with a fine grain and thin sections, is the most common wood used by a turner. This wood was especially good for creating fine features due to its close spacing. It was used regularly to make double-sided combs, which were made from this wood. Boxwood was also used to make lid boxes, also known as pyxides.
Dimensions of the lidded box
The size of a lidded box depends on the type of wood you use. Maple and cherries are the most popular woods. These two wood types make great boxes because they have different shrinkage rates. For a good quality box, the wood should be 3 inches squared and 5-6 inches long. Choose dry wood when choosing the box material. You can use exotic woods to create a lid that is attractive and appealing, but it is best to be familiar with the process.

Preparing the wood is an important step. You will need a thin chamfer to smoothen the bottom of your box and make it round. Next, make a V shaped cut at the joint. Once you are satisfied with the shape, you will be able to use a spindle-roughing tool to finish shaping the remainder of the box. To mark the bottom of your box before you begin carving it, use a parting instrument. Then, you can use a skew-chisel or a pencil to create a small chamfer at the base of your lid. This will soften and conceal the slight circularity at your base/lid junction.
FAQ
Where can I locate free woodworking plans
For free woodworking blueprints, you don’t need to read any magazines or buy any books. Just search Google. Enter "free woodworking", and you will see hundreds upon hundreds of websites offering free plans.
What would you recommend as a starting material for woodworking?
Start off with softwood like pine and poplar. After you are comfortable with the softwoods, move to hardwood.
How much should a hobbyist invest to get started?
If you're looking to start your own woodworking business, you'll probably need some capital to buy the necessary tools and supplies. Start by getting a small circular saw saw, drill press or circular saw. These items won't break the budget and aren't expensive.
How often should new supplies be purchased?
You'll probably have to replace some of your tools over time. Sharpening hand tools is a must. And if you're using power tools, you'll need replacement parts periodically. To avoid buying too much at once, try to spread your purchases out over a few months.
Statistics
- Overall employment of woodworkers is projected to grow 8 percent from 2020 to 2030, about as fast as the average for all occupations. (bls.gov)
- Most woodworkers agree that lumber moisture needs to be under 10% for building furniture. (woodandshop.com)
- If your lumber isn't as dry as you would like when you purchase it (over 22% in Glen Huey's opinion…probably over 10-15% in my opinion), then it's a good idea to let it acclimate to your workshop for a couple of weeks. (woodandshop.com)
- The U.S. Bureau of Labor Statistics (BLS) estimates that the number of jobs for woodworkers will decline by 4% between 2019 and 2029. (indeed.com)
External Links
How To
How to join wood without using nails
Woodworking is a popular hobby. You can make useful items from wood with your hands, which is both relaxing and fun. There are times when two pieces of wood need to be joined together. This article will show you how to do it to make your woodwork projects look great.
You will first need to trim the edges of your wood pieces before joining them. You don't want any sharp corners to cause problems later. After you have completed this step, you are ready to glue your boards together.
When working with hardwood, glue should be applied only to one side. If you're using softwoods like pine or cedar, you should put glue on both sides. Press the boards down until the glue is fully incorporated. Before moving onto the next step, make sure the glue has dried completely.
After you glue your boards together, drill holes at the joints where screws will be inserted. These holes will differ depending on the type and size of screw you are using. For example, if your screw is a 1/2-inch wooden screw, drill a hole that is at minimum 3/4 inches deep.
After drilling the holes, you can drive the screws into your board's backside. Do not hit the boards' front surfaces. It will ruin the finish. Try to not hit the ends of the screws when driving the screws. This will prevent the wood from splitting.
You'll need to protect your completed project from the elements. You have two options: seal the whole furniture piece or just the top. It doesn't matter what method you use, you want something that will last many years. You can choose from oil-based varnishes or polyurethane, shellac and lacquer as examples.
These products can generally be found in any home improvement shop. It is important to ensure that you purchase the correct product for the job. Don't forget to keep in mind that some finishes are toxic. When handling certain finishes, wear protective gear.