Chip carving is a difficult task if you have ever tried it. There are many styles and techniques you can use, but which one is the best? What tools are you going to need? Here are my tips and tricks to carve chips. I hope this helps you decide what one is best for you. You'll discover that chip carving success is possible with several key elements.
Traditional
Chip carving is one of oldest forms of woodcarving. You will need a straight-edged blade knife, but you can also use a skew-ground and offset knife. Chip carving involves making small triangular cuts in wood to create patterns. This art form evolved in different countries simultaneously over 1,000 year ago. Because of its widespread popularity, the designs were often so similar across nationalities that it was impossible to discern one from another.
As wood carving spread across the globe, generations passed down the skills. Chip carving was a popular way to decorate furniture in Sweden. Eventually, schools were opened to teach the craft. The skills and knowledge of carvers from centuries ago have benefited modern chip carvers. Through the generations, knowledge and experience was passed down from carver to apprentice and student. It is a process that lasts a lifetime and continues to this day.
Free form
If you've always wanted to try chip carving, you've come to the right place. Murray Taylor has created a DVD that shows you how create both freeform and geometric carvings. It is an excellent introductory project with plenty of information. English and NTSC formats are also available. You can also buy the DVD in widescreen or stereo. The owner of the DVD is Artisan Media Ltd., and it is available in MP4 format for Windows and Mac computers.
Triangles, circles and lines are the basic shapes of geometric chip carving. This technique can be combined with different styles and shapes to create endless possibilities. This is also known free-form chip carving. Your chips can be any shape you like, from a flower to a dragon. The best way to incorporate different techniques into one piece is by freeform chip carving.
Techniques
Chip carving has been around for centuries. There are many examples all over the world. In the South Pacific Islands, for example, chip carving has been found on boat paddles and ceremonial tool handles. Although most of these carvings were done with bits of bone or seashells, some have also reported using shark teeth. This book shows you how to create beautiful designs with a variety of chip-carving techniques.
If you're familiar with a few basic techniques, chip carving is very simple. The first step is to learn how you can carve the fine triangle. This pattern can be understood and executed quickly. This pattern is easy to carve. You simply need to cut various triangles, and then repeat the process. But this doesn't mean you have to carve boring patterns. By changing the triangles, it is possible to create many different patterns.
Tools
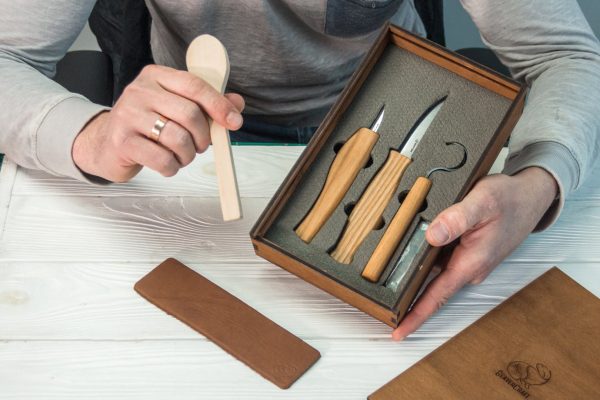
You can learn the basic steps of chip carving by attending a free online seminar from Lora S. Irish. She will show you how to use various carving tools, including a stab knife, chip knife, and detail bench knife. Irish will also be demonstrating the different types and uses of wood carving tools. To purchase the right tool, you can choose from this list. You can use these tools to create simple shapes and designs, or work more intricately and make more intricate designs.
A chip carving knife employs special geometry. It measures approximately one-half inches in length and has a narrow, curved edge at the back. This allows for precise incisions. A sharp point is essential to ensure that edges meet perfectly. Chip carving knives are also made of stainless steel and come with a sharp tip. A chip carving knife should be sharp enough to cut a sliver of wood.
Getting started

Before you can begin chip carving, it is important to understand the process. The process will vary depending on what type of carving you are doing. Nevertheless, you should be aware of some basic principles to ensure that your work is as accurate as possible. Chip carving is the art of cutting fine patterns in wood. Follow these steps for your first chip carving:
It is vital to sharpen your chip carving knife properly. The blade of the chip carving knife will have bevels on each side, indicating that it is a primary chip carving knife. The sharpening rock is shaped as a diamond, and can produce effective edges. It should be placed at a 10-degree angle. The stone will sharpen the chip carving knife and chip carving tool at the same time.
FAQ
What kinds of woods are good for making furniture?
Woods are classified by their hardness. Softwoods can be pine, fir or cedar. They are great for outdoor furniture as they resist rot. The hardwoods are oak, maple and mahogany. Because they are not weather-resistant, they are best used indoors.
Which material would you recommend for woodworking lessons?
Start off with softwood like pine and poplar. Once you feel comfortable with these two, move on to hardwood.
What is the difference in a hobbyist and professional woodworker?
Hobbyists like making things with wood. Professionals focus more on quality. Hobbyists tend to take pride and share their creations with family and friends. Professionals will spend hours researching designs before they begin working on a project. They'll pay great attention to details, from choosing the most suitable materials to finishing the work perfectly.
Where can I locate free woodworking plans
For free woodworking blueprints, you don’t need to read any magazines or buy any books. You just need to search Google. Just enter "free woodworking" into the search bar, and you'll see hundreds of websites where you can download free plans.
Is it difficult to start my woodworking business?
Starting your own woodworking business isn't easy. There are many regulations and legal requirements that you will need to comply with. However, it doesn't necessarily mean you must go through all the hassle of setting up a business. Many people opt to join existing businesses instead. You will only have to pay membership fees, taxes, and other charges.
How do I get started as a woodworker?
Woodworking is an art. It requires patience. It takes time for you to master the different techniques and tools that are required to woodwork.
There are many woodworking tools on the current market. Some prefer power tools while some prefer hand tools.
You have the freedom to choose what tool you want, but it is important that you select the right tool for your job. You might start with a simple set of tools if you don't have much experience.
You might also consider learning how to use the router to create intricate shapes from wood. These tools can be purchased at most hardware stores.
Do you have any advice on how to start a woodworking business.
It is hard work to start a woodworking company. You won't mind working hard if your hobby is something you love. You'll likely enjoy the challenge of owning your business.
One thing to keep in mind when launching a new venture is that you might encounter unexpected problems along the way. Unexpectedly, money might run out. Or maybe you'll find that customers aren't willing to pay as much as you'd hoped. To survive, you'll need to be prepared for such situations.
It is a good idea to create a separate bank account just for your company. You'll know exactly how much money is coming in by setting up a separate bank account.
Statistics
- Overall employment of woodworkers is projected to grow 8 percent from 2020 to 2030, about as fast as the average for all occupations. (bls.gov)
- Average lumber prices rose about 600 percent between April 2020 and May 2021. (familyhandyman.com)
- The U.S. Bureau of Labor Statistics (BLS) estimates that the number of jobs for woodworkers will decline by 4% between 2019 and 2029. (indeed.com)
- The best-paid 10 percent make $76,000, while the lowest-paid 10 percent make $34,000. (zippia.com)
External Links
How To
How to make wooden joints
This tutorial will teach you how to join two pieces wood together. We will be using the "pocket-hole joint", which involves drilling holes in wood and then gluing them together. This method works great if your wood is straight and smooth. You may want to consider other methods, such as dowel joining. Here are the steps
-
Drill Pocket Hole Joints. Measure and mark the location where you would like to place the pocket hole joint. Use a jigsaw or handheld drilling machine to drill 3/8 inch deep holes at the ends of each wood piece.
-
Sand Smooth. You can sand the edges of the wood to ensure that it doesn't split.
-
Glue Together Apply glue to the sides of both wood. Let it sit for about 5 minutes before clamping the pieces together.
-
Fix the Pieces together. After the glue has dried completely, you can clamp the pieces together until they are flush.
-
Trim Joinery. Trim any excess wood surrounding the joint once the glue has dried completely.
Allow enough space between pieces so you can turn them inside out.