
There are many advantages to using a disk sander, from its fast finish to its mitre gauge. Although these sanders are less portable than other models, they still provide the same high quality finish. Look around to see which one best suits your needs. Below are some of the most important benefits of a Disk Sander. If you want to purchase one, you'll need to choose between a sander that combines both sanding methods.
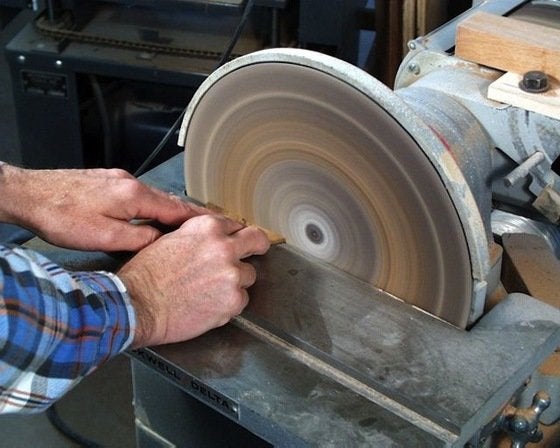
Face sanding can be done with disk sanders
Disk sanders can be used as versatile sanding instruments. The rotating disk spins on a steel or aluminum backing plate to smoothen the surface of a material. The disc's center screw and washer are hidden and do not protrude into the work area of the sanded surface. The worktables of benchtop disk sanders can be adjusted for miter gauge slots and end cuts. Most disk diameters range between four to eight inches. You can get larger models with capacities up to twelve inches.
They are quick to finish
Disk sanders offer speed and efficiency. There are many sizes of disk sanders, from small hobby machines to large industrial machines. Most home shops use a 12 inch disk. Most disks made of pressure-sensitive adhesive are 12 inches in diameter. If you need a quick smooth finish on a project, a disc sander is a good investment.
They are lighter than other sanders.
A disc sander, a hand tool for smoothing small or thin cuts, is a hand tool. They are also less portable than other disc sanders. They aren't as portable but they can be used for various hand jobs like sanding wood, metal and plastic. They can be used to sand small and large objects, and they are very affordable. They are excellent for shaping and smoothing many types of materials.
They have a mitre gauge
A disk-sander has several benefits, including a mitre gauging feature. This allows the workpiece to be guided against the disc and prevents tearout. Then, it extends the fence height, protecting your fingers from the blade's edge. A clamp can be used to secure the miter gauge. Bernard Lewan gave this tip. Here's how you can set it up.
They have an adjustable table
The first step in using a disk sander is to set the table's height and tilt to the desired setting. When using a table with an adjustable height, make sure that the workpiece is overhanging the table. If it does not, the workpiece could strike the sanding disk. Make sure to check all controls on the table including the powerplant, carriage, table height and quill lock. You can also add a miter gauge extension if you require more support.

They have dust ports
A dust collector housing is attached to the disk sander. The entire sander is enclosed in the dust collector housing. Only the front half of this housing is visible to the workpiece. The dust collector housing must be removed and the front part of the sander should be exposed to expose the disc. Bolt 90 can be quickly released using a hex wrench 34. To secure the bed 16 vertically, it is necessary to tighten bolt 90.
FAQ
How do I know what tools are best suited for me?
When shopping for tools, it helps to think about your needs and preferences. Are you more comfortable with plastic or metal handles? What size screws and nails do you use most often? Are you comfortable with power tools, or would you rather use hand tools?
How often do I need to buy new supplies
You will likely need to replace some tools over time. If you are using hand tools, you will need to sharpen them frequently. And if you're using power tools, you'll need replacement parts periodically. Try spreading your purchases over a few months so you don't buy too many at once.
Is it possible to refinish your own furniture?
Yes! There are many options for refinishing furniture that you don't need to hire a professional. Here are some examples:
Use sandpaper for removing stains and scratches. After that, use a clean towel to wipe the surface.
Apply clear polyurethane finish. Allow to dry thoroughly before moving furniture.
Paint furniture with acrylic paint.
Use stain instead of paint. Furniture will look richer with the stain.
Shellac wax can be applied. Applying wax will give the wood shine and protection.
Statistics
- Most woodworkers agree that lumber moisture needs to be under 10% for building furniture. (woodandshop.com)
- Overall employment of woodworkers is projected to grow 8 percent from 2020 to 2030, about as fast as the average for all occupations. (bls.gov)
- If your lumber isn't as dry as you would like when you purchase it (over 22% in Glen Huey's opinion…probably over 10-15% in my opinion), then it's a good idea to let it acclimate to your workshop for a couple of weeks. (woodandshop.com)
- The U.S. Bureau of Labor Statistics (BLS) estimates that the number of jobs for woodworkers will decline by 4% between 2019 and 2029. (indeed.com)
External Links
How To
How to stain wood
The process of staining wood involves the application of chemicals to the wood's surface, which causes it to change its color. This chemical reaction causes wood to turn from whiteish to brownish. Although oak is the most popular type of wood to stain, there are many other types that can be used.
There are many ways to stain wood surfaces. Some methods involve mixing the stain with a solvent (such as turpentine) and then brushing or spraying the mixture onto the wood. Some methods involve a mixture of water and dye that is applied directly to the wood. You can also mix stains with varnishes or paints so that they become part the finish coating.
The first step in staining wood is preparing the surface. You must clean the wood well to remove any grease or dirt that might interfere with the application of the stain. Sanding smoothens any scratches or rough spots. Next, you need to decide which stain you want. There are two types of stains that can be used: penetrating and non-penetrating. Penetrating stains penetrate deeper than non-penetrating stains, which makes them great for dark colors like mahogany. Non-penetrating stains work best with light colors like maple.
You will need to decide on the type of stain you want to use, and then prepare your tools. Paintbrushes are great for applying stain because they allow you to evenly spread the liquid across the surface. It is a good idea to have rags on hand in case you need them to clean up any stains that may remain after you have finished painting. If you intend to mix the stain yourself you will need enough containers to hold all the components.
After you have prepared the materials, you can clean the area where you want to stain the wood. Clean the area with soap and warm water to get rid of dirt and grime. You can wipe down the entire furniture using a damp rag with clean water. Take care to remove all debris and dirt, especially if you are planning on staining darker wood.
Apply the stain. The stain can be applied by spraying or brushing the stain onto one end of the furniture. Slowly and carefully move along the grain of wood, slowly but steadily, until you reach the other end. You must be careful not to allow the stain to drip off the wood's edges. Before moving on to the next steps, allow the stain drying completely.
A coat of clear polyurethane sealing agent is applied to protect the paint. Apply three coats polyurethane sealer. Allow the third coat of polyurethane sealer to dry overnight before applying the final coat.