
This article will describe the methods involved in woodturning an inlay. We'll also discuss the materials used and how to maintain them. We will use a rotary-tool handlepiece and a 1/16 inch upcut spiral bit to create a mortise or inlay. Keep reading for more information. It's easy to do! You will probably find this simple but rewarding project enjoyable. You can't turn a woodturning project without inlays!
Techniques
Inlay techniques may be an essential part of any woodworking project. They can add character and beauty to the finished product, as well as enhance its aesthetic appeal. There are many options for creating beautiful inlays. Each has its own benefits. This article will give you a guide to the different methods available. Continue reading for more information! Preparing the wood is the first step. You can clean it with a damp cloth or a paper towel. To get rid dirt and residue from the wood, you can use mild dish soap. Chemicals can damage the wood so be cautious when using them. You may also want to use hand tools, as opposed to using routers to cut the wood into inlay patterns.
You can also use inlay techniques on other materials. You can use inlay techniques to other materials, such as stone, metal and wood. If done correctly, inlaid pieces add a wonderful contrast to the piece. You can use a variety of inlay tools to secure the inlayed items in place, including jigs, knives and fixtures. Inlaying can take place before or after you turn the wood. After turning the piece of wood, you can add inlay items to the top or the bottom.
Materials
A wide range of inlay material options can be used to enhance the visual appeal of your object. You can use inlay material to cover many recesses, such as those created by the turning of the lathe, natural cracks or voids in wood. Inlay materials can be used to cover brad nails or screw heads in some cases. Follow these steps for creating beautiful inlays.
First, choose a material. Certain materials are better suited to this purpose than other. It is easier to cut delicate pieces with resin inlay than other materials. Also, it fills in the voids left after mortises have been made. Additionally, resin is available in many colors, which can be magical at times. Here are some tips to use resin as an inlay material.
Installation
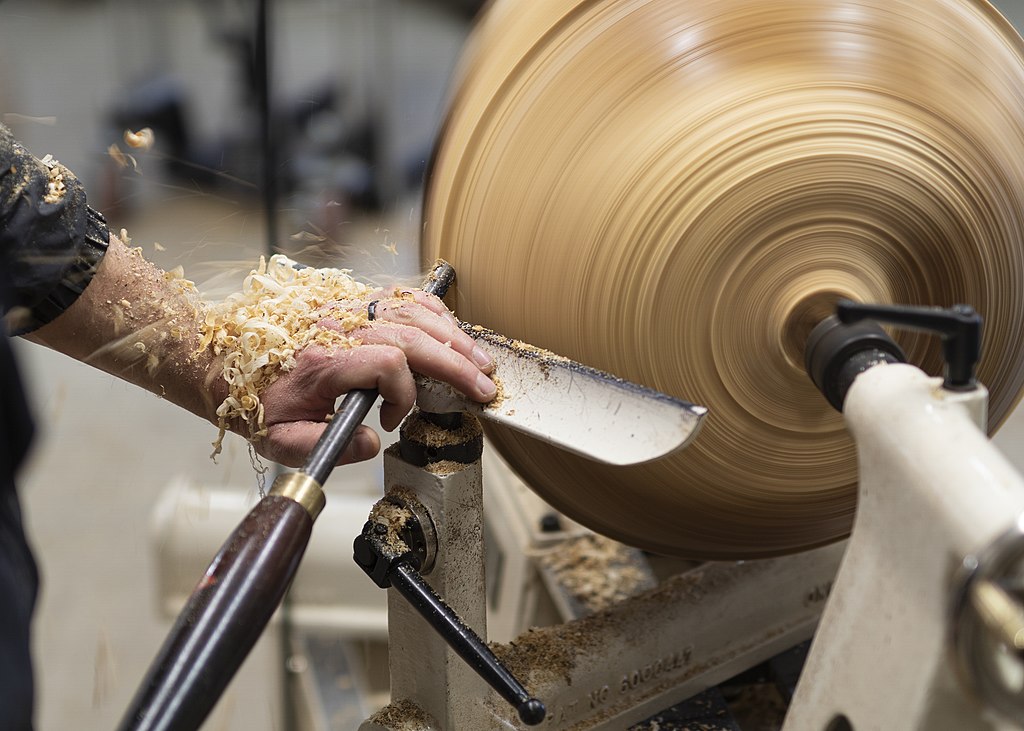
Inlay work is a decorative technique that can be used to turn wooden objects. Woodturners can learn how to install woodturning inlays by following Ron Hampton's detailed instructions. He demonstrates the steps involved in installing inlays on bottoms and tops. He provides safety guidelines and explains the importance to precision. This technique gives wood turnings a unique look. Woodcraft offers a variety of inlay bands.
To install woodturning inlay, you first need to prepare the base of the piece of wood for the inlay. Use a plunge router for best results. Attach the template guidance to the router base. The bushing should be pressed in the correct position around the guide collar. After placing the inlay, make sure the base is flat. The angled edges of the inlay will make it easier to install. You will have a much easier time installing the inlay when you use a router with a bit slightly larger then the mortise.
Maintenance
Woodturning inlay requires only a few simple steps. Before putting your inlay in your woodturning project, you need to clean it thoroughly. This is especially important for those using CA glue in stone inlay. A 3/16" allen wrench can be used to measure the inlay's depth if you have limited space. You can sand your inlay to 120 grit to avoid scratching it.
FAQ
How does a beginner woodworker earn money?
Many people are beginning to learn how build furniture to launch an online business. If you are just starting to build furniture, there are many other ways to make money than selling on Etsy. You could also sell at craft fairs, or other local events. For those who want to build their own furniture, you might offer workshops. You might be able to offer services like remodeling homes or making custom pieces for clients if you are a skilled carpenter.
Is there anything else I should know about woodworking?
It is easy for people to overlook the work involved in furniture making. Finding the right kind of wood is the most difficult part. There are so many wood options that it can be difficult to choose the right one.
The problem with wood is that not all wood properties are the same. Wooden can split or crack, while some woods may warp. These factors should be taken into account before buying wood.
What tools are best to begin with when I become a woodworker
Woodworking requires patience and practice. It takes time for you to master the different techniques and tools that are required to woodwork.
There are many different types of woodworking equipment available on the market today. Some people prefer using power tools while others prefer hand tools.
While you have the option to pick what you like, it is essential that you get the right tool for the job. If you don't have any experience, you may consider starting with a basic set of hand tools.
A router is a tool that cuts intricate shapes in wood. You can also learn how to use it. These are available at most hardware stores.
Can I refinish my own furniture?
Yes! There are plenty of ways to refinish old pieces of furniture without having to pay a pro. Here are some examples:
Use sandpaper to remove scratches and stains. After that, use a clean towel to wipe the surface.
Apply clear polyurethane varnish. Allow to dry thoroughly before moving furniture.
Acrylic paint is a great way to paint furniture.
Instead of using paint, stain is a better choice. The furniture will have a rich look thanks to the stain.
Use shellac wax. This will protect and shine the wood.
How do I calculate woodworking prices
The most important thing to remember when calculating costs for any project is to keep them as low as possible. Always make sure you get the best price on materials. Also, consider all other factors that can affect the price of your projects such as skill level, experience, time and cost. To get an idea about the average cost for common household DIY tasks, see our guide to the average woodwork project price.
Statistics
- Overall employment of woodworkers is projected to grow 8 percent from 2020 to 2030, about as fast as the average for all occupations. (bls.gov)
- The best-paid 10 percent make $76,000, while the lowest-paid 10 percent make $34,000. (zippia.com)
- Average lumber prices rose about 600 percent between April 2020 and May 2021. (familyhandyman.com)
- In 2014, there were just over 237,000 jobs for all woodworkers, with other wood product manufacturing employing 23 percent; wood kitchen cabinets and countertop manufacturing employing 21 percent. (theartcareerproject.com)
External Links
How To
Here are some tips on how to drive nails in wood
The first step in driving a nail into wood is to choose the correct size and type of hammer. The most common types of hammers are claw hammers, sledgehammers, mallets, ball peen hammers, and hatchets. Each type of hammer has its pros and cons. A claw hammer works well when you're trying to hit nails with a heavy hammer. However it is difficult to precisely control where the blow hits. Although a sledgehammer can be used to hit large areas quickly, it is too heavy to be useful for small tasks.
Once you have chosen the right hammer for you, put your hand flat against its side so that it rests comfortably in the palm of your hand. Take the handle and hold it with both hands. But don't press down so hard you injure yourself. You should hold the hammer straight-up, with your wrist still relaxed. Then swing the hammer back toward the ground, aiming for the center of the nail. The impact of the hammer hitting the nail should be felt. You can practice swinging the hammer with a block or wood until you feel the rhythm.
Once you are ready to drive the nail, place the hammer close to your body. You will need to position the nail so it is parallel to the wood. Your eyes should be focused on the nail's tip. Swing the hammer forward, then follow through with the motion of the hammerhead. Continue this motion several times, slowly increasing the speed of each swing. When you are confident with the technique, add power to your swings. To make it more powerful, hold the hammer up high to your shoulder and then bring it down. You will be able to use more energy and put your best foot forward.
Once you've nailed the first hole, remove the hammer from the nail. To remove the remainder of the nails, you can use a screwdriver/pry bar. Keep the nails heads in line with the surface of the board to prevent splitting the wood.